Portfolio
Facebook
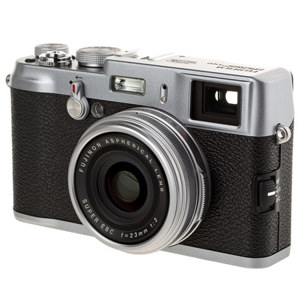
Fuji x100 review and tutorial Part 1
Intro:
It seems like everyone has reviewed this little gem already. It is a fantastic camera. I am not going to repeat the existing reviews if I can help it. I instead want to show you why it is such a good camera. This will be a multi part review with examples from my recent trip to Edit: Lisbon and Spain where I used the camera extensively and beside my friend’s Nikon D5000.
Here’s what you should know already. The camera is small and inconspicuous. Most people who notice it ask if it is an old camera. I probably benefitted from that, as there are ladrones, or thieves most places you travel. In fact, one of our friends had her purse and camera stolen off of the back of her chair while we were eating dinner in Seville. Be careful out there, and keep your camera on your person at all times. Almost all the other tourists taking pictures had huge SLRs hanging from their necks. This was much nicer. The image quality was great, the focus is difficult and it is slow to use.
All the images are straight out of camera except where noted.
My Take:
Here’s why it is fantastic. Features #1: (yes two features make the top feature of this camera.) high flash sync speed and a built in neutral density (ND) filter. These two features combined make this a great camera for using outside and taking the kind of pictures I like to take. Pictures like this:

ISO 400 F2 1/2000 ND filter on Direct flash
The ND Filter:
For some reason I had the camera set to ISO 400. Looks like a mistake on my part as I was trying to darken the sky. Nonetheless, it doesn’t matter much because the Fuji let me do it. I will walk you through how the fuji works its magic. This is a sunny day in Lagos:

Sunny Day. ISO 200 F2, 1/2000 with the exposure raised in lightroom to simulate f/2 1/2000 without the ND filter
It is a beautiful place, but it’s not quite where I want it exposure wise. This will be a portrait of my favorite model, so I like the background underexposed to really highlight the subject. Flip on the ND filter. The ND filter drops the exposure three stops. This does several things. First, it allows me to use F2, or to be wide open in direct sunlight. Turn on the ND filter.
That’s what I like. You see the sun is our frenemy. We want light and pretty blue skies, but we don’t want washed out pictures. Generally, in the sun our exposure is 1/iso at F16. The “sunny 16″ rule. That means at iso 200, the “correct exposure” is 1/200 at F16. If I want to shoot wide open at F2, I have to kill 6 stops of light somewhere. Six stops is way too much light coming into my lens. To get a correct exposure, I have to raise the shutter speed from 1/200 to 1/12800! No camera that I know of can shoot at 1/12800. And I want to underexpose the background by one or two stops so that I can get that deep pretty blue sky that I like. In order to do so, I would have to raise my shutter speed up to 1/51200. Rubbish.
So I drop in the ND filter. Just a button on the camera. It slides in a 3 stop “darkening” filter. This filter is in the camera body, and it isn’t something I have to fiddle with or carry with me. I can then shoot at F2 at 1/3200 to get a normal exposure. That’s in full sunlight. Fantastic. Now I can take normal exposure pictures with shallow depth of field. And if the sun isn’t blasting, 1/2000 gives me the result above that is about a stop or two underexposed. If the sun is blasting, I can move up to F4, two stops darker and underexpose that way.
Flash Sync Speed:
The background is how I want it, but now my favorite model is too dark and does not stand out from the background. Time for a little flash. On most SLRs, I am out of luck. The sync speed on my D300 is 1/250. Simply, the sync speed is how fast the camera can shoot with a flash and still have the flash show up in the final exposure. I could explain it all to you, but so many have explained it already. With my SLR, the solution is to use a ND filter, raise the F-stop until it is dark enough at 1/250, and use a mega powerful strobe to take the picture. With the x100, there is an electronic shutter that can flash sync all the way up to 1/2000. That means I can use my speedlight.
Note on High Speed Sync:
Some will say use High Speed Sync or HSS. That is a special mode on some flash/camera combos that sends out a continuous light pulse so that you can sync at higher speeds. In practice, this mode weakens the flash so much that it is just about useless for this type of picture. I don’t like it because it is inconsistent and just not strong enough unless the flash is a foot away from the subject. What I want to do is make my speedlight more powerful. I asked the mighty (I mean it. He is awesome.) Joe McNally about this, and he swears by HSS over ND filters. Nonetheless, Joe can get an assistant to walk over a Ranger from the truck, or he uses four speedlights when the HSS is not strong enough.
With the x100 I can use a speedlight for all of my basic photography needs.
A speedlight you say? Yes. Flash exposure is controlled solely by the f-stop. I am shooting at F2 with an ND filter. That means I am shooting at F5.6 with the depth of field of an F2 lens. My speedlight can easily put out F5.6 at a distance. Compare this with my normal setup that requires that my light put out F22 or F32 for the same effect. As long as you connect the x100 to a speedlight with a cable, you can easily sync at 1/2000. That means I can get this out of the x100:

ISO 200, F2, 1/2000, sb900 connected by cable set at 1/4 power through a small softbox
I have a slight warming filter on my SB900 for the folks that need all the details. A 1/2 CTO or CTS I think. This is a picture that I absolutely cannot get with my SLR and my speedlight. My Elinchrom Ranger may not even have enough power to get this photo at F2, because I would have to put a crazy dark ND filter to even try it. (besides, I would not likely be able to focus with a 7 stop ND filter on my camera either.) Fantastic!
The last related feature that I will mention in this post is that you can preview your images through the viewfinder. That solves one of the biggest obstacles to taking pictures in the bright sunlight. I can preview my images without using a loupe or covering the back of the screen with my hands. That alone lets me work faster.
Next sharpening and low light performance.
4 Responses to “Fuji x100 review and tutorial Part 1”
Share Your Thoughts
Leave a comment to contribute to the discussion
To let us see what you look like, get a gravatar.
Portfolio
Facebook


Hi,
Only one thing, the 1st picture is not in Spain but is in Lisboa the capital of Portugal.
Regards,
Pedro
I corrected the post. All of the pictures are in Lisbon. We spent the majority of our time in Spain, and so we think of it as our Spain trip.
Thanks,
Sam
i love this post! makes me want to go buy a ND filter and play with flash
Do it!! Let me know how it goes and if you need help.